When you first open Micaic, you will be confronted with a blank Collection Window.
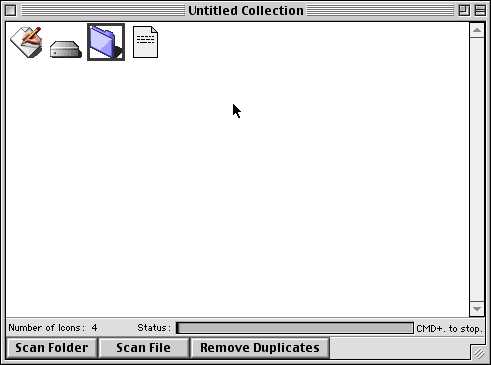
A Collection Window With Four Icons
The Collection Window is where you can collect and store icons. There are four ways to bring icons from an outside source into your collection. The first is to scan a file. To scan a file, press the "Scan File" button, select "Scan File" from the Collection menu or type Command+E. Once you have done that, a window will pop up prompting you to select the file you want to scan. Once you have chosen your file, Micaic will extract all the icons from that file and add them to the currently selected Collection Window. The second way to import icons into your Collection Window is to scan a folder. Do this by either pressing the "Scan Folder" button in the Collection Window, selecting "Scan Folder" in the Collection menu or typing Command+I. After you have chosen which folder you want to scan, Micaic will scan all the files in that folder for icons and then it will scan all the sub-folders of the original folder until there is nothing left to scan. If you get tired of waiting for Micaic to finish scanning a folder, you can have it stop, but still keep all the icons it has scanned so far, by pressing and holding Command+.(period). (Note: When Micaic scans a folder it will not follow any Aliases to their originals. This is to prevent the possibility of infinitive loops.) The third to add icons is by copying a picture and then selecting the Collection Window and pasting (Command+V) the picture into it. The final method of adding icons is Import a Collection. Do this by selecting "Import Collection" under the Collection menu and selecting the Micaic collection you want to import. This is the same as opening a collection except that the icons are added to the currently selected collection.
Once you have a fair sized collection of icons, you can have Micaic automatically remove any duplicated icons. To do this press the "Remove Duplicates" button in the collection window, select "Remove Duplicates" from the collection menu or type Command+D. The status bar will track the progress of duplicate removal. It may take a bit of time to remove all the duplicates, but if you need to stop the removal of duplicates in mid process, you can do this by typing Command+.(period).
Once you have amassed a fair sized collection, you can start creating a mosaic by typing Command+M or selecting "Make Mosaic…" under the File menu. When you do this, the New Mosaic Window will open.
.
A New Mosaic Window With a Picture Selected
To choose the picture that the mosaic will be based on, click the "Select Picture" button. I recommend that the picture you chose should be no bigger than 150 pixels by 150 pixels if you are going to have you Icon Size set at four. This is because if you choose too big a picture, it will take a very long time for Micaic to create the mosaic and Micaic might run out of memory.
Icon Size- The size of your icons sets how many pixels of the mosaic base each icon will cover. Since each icon is 32 pixels by 32 pixels, if you had the icon size set to 4X4, the picture size would be multiplied by 8 (32/4=8) to fit in all the icons. If the icon size were 16X16, four icons would cover the same amount of the original picture that 16 icons would cover if the icon size were 8X8. Reducing the icon size makes the mosaic more detailed but slows down the rendering of the mosaic. If you make the icon size more than 32X32, the mosaic will actually be smaller than the original picture!
Don't use the same icon twice- If this option is selected, each icon in the collection the mosaic is being made from will only be used once. This can result in very interesting mosaics, but you will need a very large collection of icons to make a satisfactory mosaic. Also be sure that you have enough icons to actually complete the mosaic without using an icon twice.
Allow background tasks- Allowing background tasks let you do other things while your mosaic is being made (writing this document for instance). If you do not allow back ground tasks, you will not be able to do anything while your mosaic is being made. In addition to this, Micaic will be using all its resources to make the mosaic so you will not be able to monitor how the mosaic is progressing. The only way to stop a mosaic being made if you do not allow background tasks is to force quit or restart! The advantage of not allowing background tasks is that mosaics are finished significantly faster. So if you have an older computer, you might want to disable this option,
After you have pressed the "Create" button, the New Mosaic Window will close and then the window in which the actual mosaic is made will open. Now all you have to do is sit back and watch the show!

The Mosaic Window With One Icon Placed And The Scale Menu Selected
You can change the display size of the mosaic by choosing a different value from the Scale menu which is in the lower left hand corner of the window. (It is selected in the picture above.) Having the scale at 100% makes the icons full-sized. If you want to see the mosaic at the size of the original picture, select "Original Picture Size" from the scale menu. If you want a scale size that is not on the scale menu, select "Other…" from the menu. A window will open prompting you to enter the scale size you want.
